Events
For most situations, simply choose one of the buttons in #create-event.
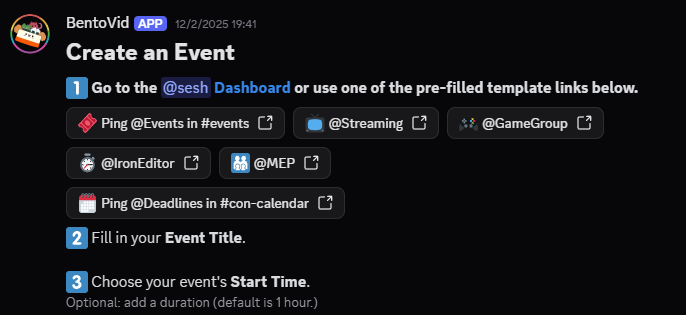
If you want full control or just want to learn more, read below.
Sesh
For full customization, click here to create an event using Sesh.
If you want all the settings necessary for most common scenarios, use the buttons in #create-event.
Templates
Note: using the buttons in #create-event will automatically select a template
Templates make creating an event easier. Please note that at a minimum, you will still need to add a title, time, and description.
On the Sesh "Create Event" page, click the "Template" text in the top right.

In the new window, select the "favorited template" closest to your needs. You can also create exact copies of past events if you select one of the items in the "Previous Events" list instead.

Event Titles, Time, Duration, and Description

Our server uses eastern time, but you can input any timezone and Sesh should convert it for you automatically.
Make sure to check the preview below the Start Time field to make sure it looks correct!
Alternatively, you can click the calendar icon to pick a date and time in your local timezone.
By default, events are 1 hour long. However, you can change this by clicking the "Add Duration" link in the corner.

The description is optional and accepts markdown, which means you can create clickable links. To make your own links like this, you format them like this: [Link text](https://linkurl.com)
RSVP Options
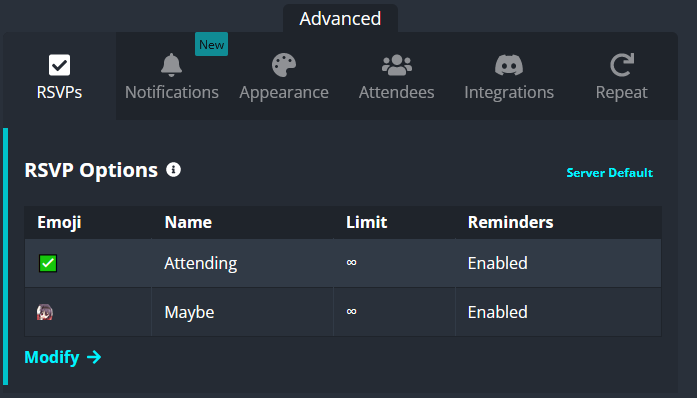
By default, the RSVP options on your event will be "attending" with a green checkmark and "maybe" with a server emoji.
However, you can change these by clicking the "modify 🡒" link underneath them.
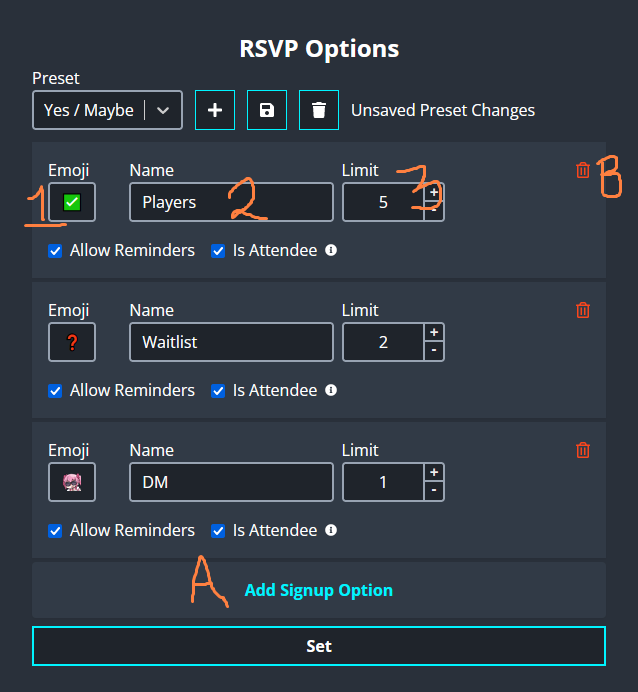
A. Click "Add Signup Option" to add a new emoji and RSVP choice. You can have up to 20, and use any emoji from a server that Sesh is in.
B. Click this trashbin icon if you wish to remove an RSVP option.
1, 2, and 3 allow you to choose an emoji (it can be from any server Sesh and you are in), a name, and a limit.
Leaving the limit blank allows anyone to RSVP using this option.
Adding a number here prevents RSVPs over the limit you specify (e.g. 5 = no more than 5 people can use this option).
Make sure the checkbox "Allow Reminders" is checked for each option - leaving this unchecked prevents the bot from DMing RSVP'd users any reminders. Since users can set their own permanent preferences with Sesh, disabling this only hurts the users who like the DMs.
In most cases, the "Is Attendee" option should also be checked. Hover over the i icon to find out what it affects.
Using the options from the image above, we create an embed with RSVP options that look like this:

Notifications
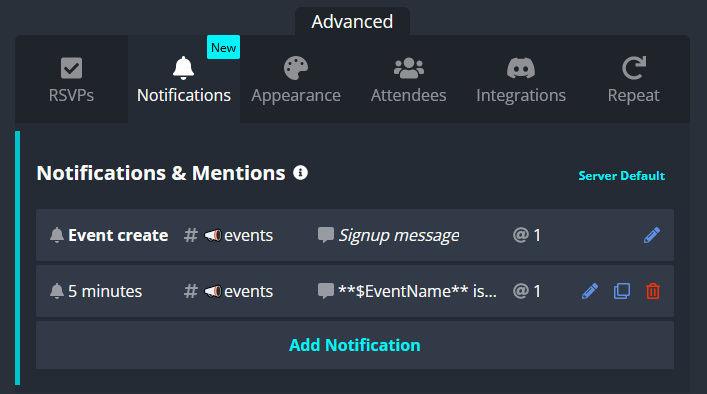
By default, Sesh will create 2 "notification" messages on in the #events channel - one for the event creation, and one for 5 minutes before your event starts. Each notification will ping the @Events role.
However, BentoVid has multiple ping lists, it is highly recommended to add the appropriate role mention to your event. Click the pencil icon next to the "Event Create" message to add the appropriate roles (and/or server members) you'd like to mention for your event.
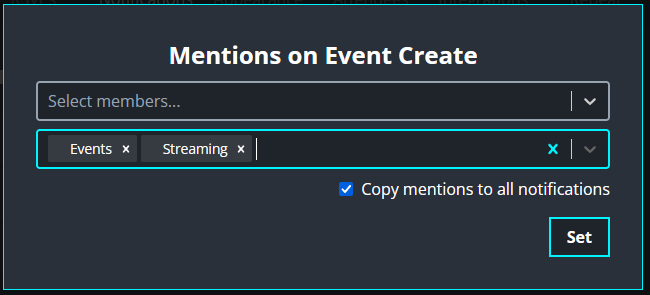
Use the following role mentions:
@Events general
@Deadlines Contest submission deadline - Note: If you have a deadline, you should change the event channel to #con-calendar
@IronEditor Iron chef/challenge/editor (time challenges)
@Streaming Video streaming
@GameGroup online gaming
@MEP Multi-editor projects/collabs
You can can join/quit these ping lists at any time in Channels & Roles
Also make sure "Copy mentions to all notifications" is checked. Click "Set" to save the options.

Now you can see that your notifications have 2 mentions each.

Each "notification" will create a new message in Discord at the assigned time. It is best not to make too many, as the people who RSVP to your event will also have DMed reminders. The "Event Creation" notification content cannot be edited, but all others can have their content customized.
If you would like to change the current notifications or create new ones, you can select the pencil icon near the current notifications or the "Add Notification" link to create an entirely new post. You can learn more about how to edit notifications by clicking here.
Appearance
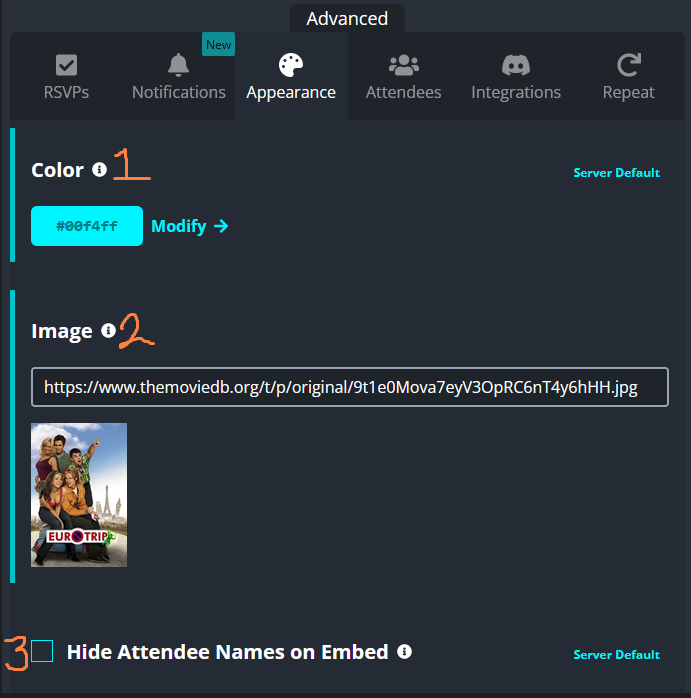
1. Embed color
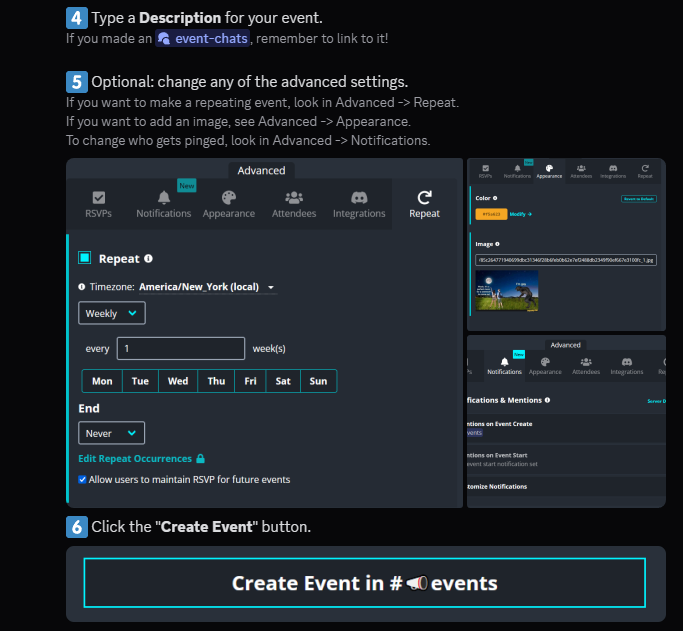
If you want to, you can customize the embed color by clicking the "modify" link. The embed color is the little line that shows up on the left of the post.
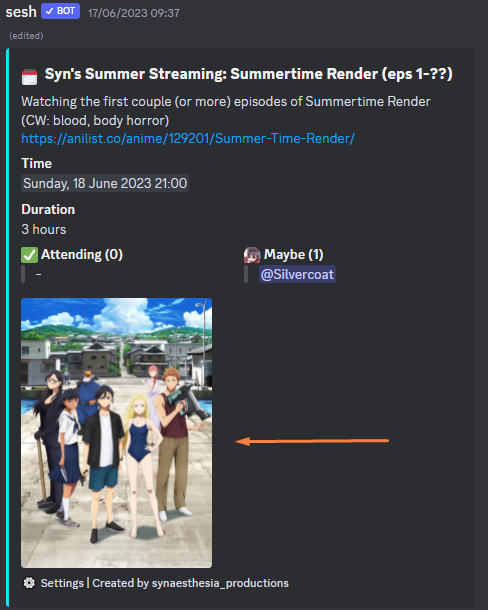
In the image below, it's dark blue.

2. Embed Image
You can also add an image to your embed.
If you can't find the proper link, you can upload your image to a private discord server (or in #personal-testing) and copy the image link from there.
3. Hide Event Attendees is an optional function.
Checking the box will hide the list of people RSVPed to the event.
See examples of the differences below:

Attendees
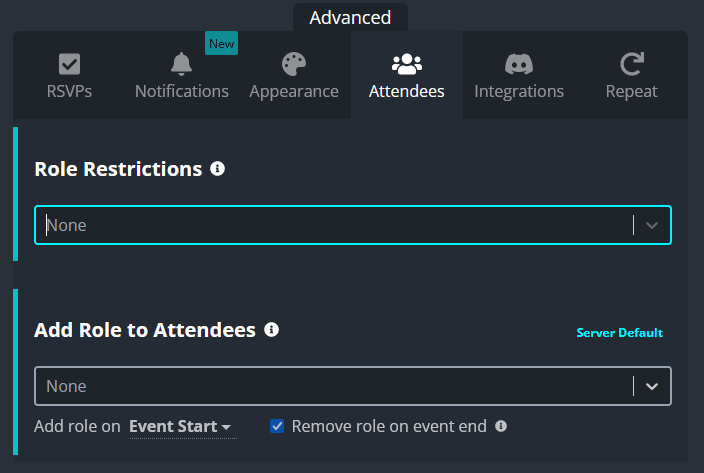
In the attendees tab, you can restrict RSVPs to certain roles, and add roles to people who have RSVPed.
Please do not use this.
Integrations
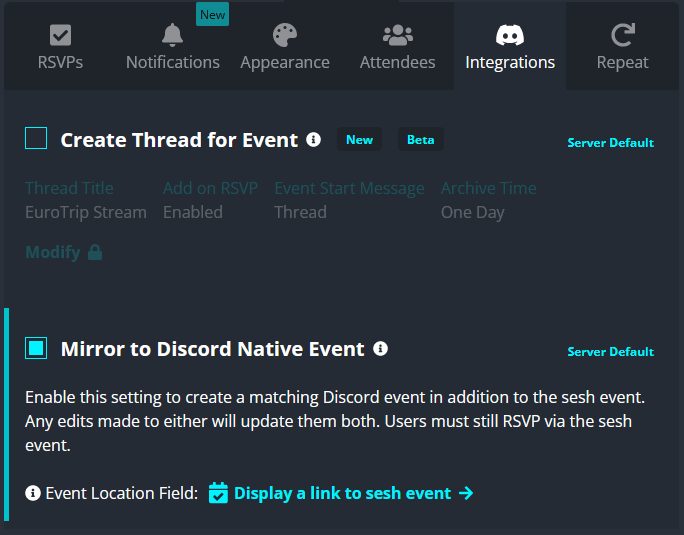
The integrations tab allows you to create a thread for your event (disabled at time of this guide - please manually make a thread in #event-chats) and clone your Sesh event to Discord's native event function.
Your event is mirrored to Discord by default, but clicking the blue box to the left will disable this.
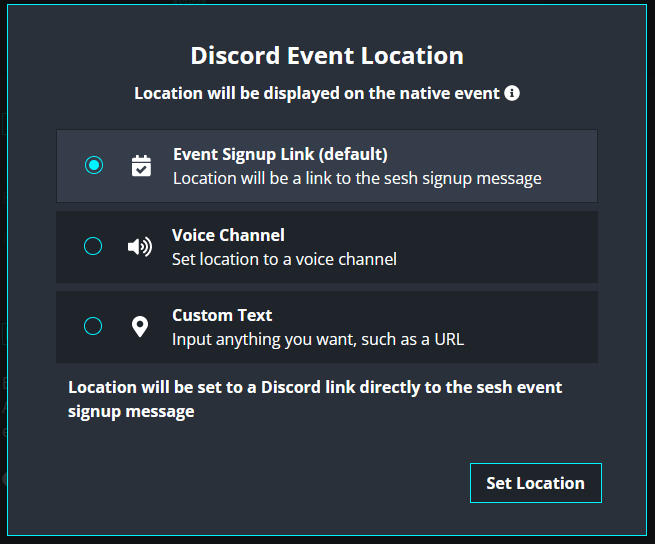
You can change what displays in the "event location" field on Discord by clicking the "Display a link to the sesh event" to choice a specific discord channel or input custom text.
Native Discord Events look like the following:

Repeat events
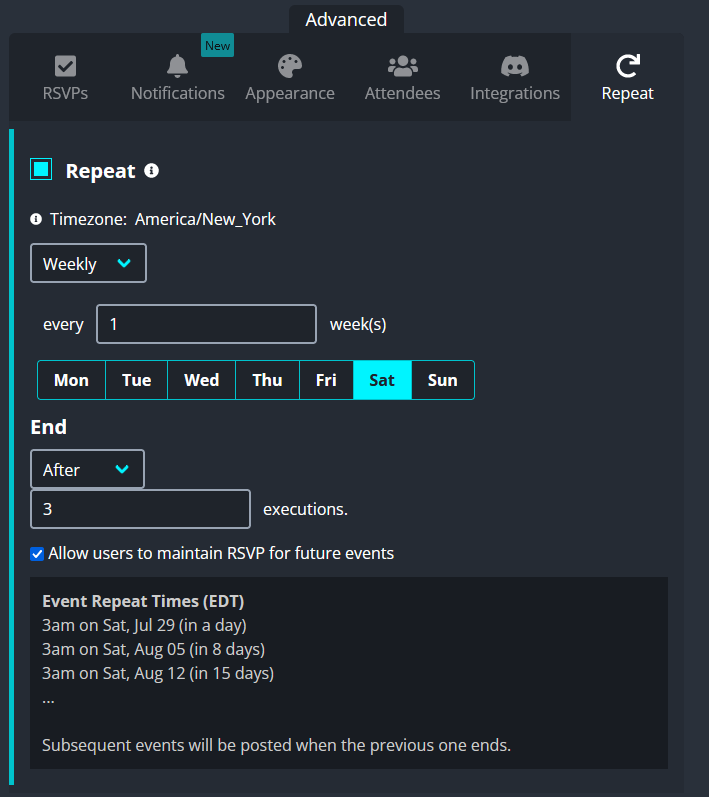
You can create repeating events by selecting the blue square next to the "repeat" text and setting your options. In the example above, our event will repeat every saturday for 3 saturdays, and then stop.
Your event creation post for the next event in the series will be posted to discord at the time the previous event ends. If when this is posted is important to you, make sure to set your event duration appropriately (this option is at the top of the page near the start time).
Ready to give it a shot? Click here to create an event using Sesh!

Sesh Personal Preferences
By default, when you RSVP to an event, Sesh will DM you with some reminder options.
If you want to change how this works, DM @sesh: /settings
Alternatively, you can set these through the dashboard after logging in by clicking your name and then "Preferences" in the dropdown.

Event Chats
In the #event-chats channel, you can make a post/thread about any event to group that conversation all in one place!
This is good if you are the coordinator and want to be alerted of comments/questions, or if you just want to share the hype!
Click the "New Post" button, fill in a title and description for your event chat, as well as a thumbnail for the list (if desired).
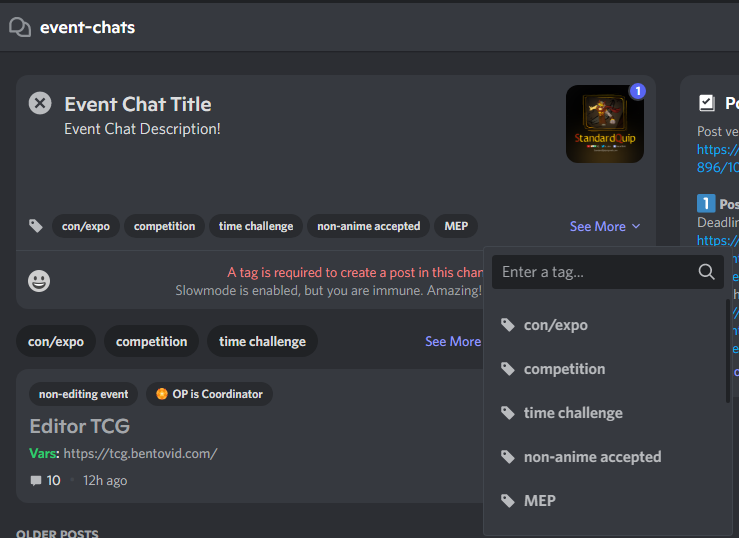
Then, pick which tags apply to your event. "OP is Coordinator" may only be added by Bentovid staff after the thread's creation.
Afterward, click "Post," grab the thread URL, and add it to your Sesh event's description! Optionally, ping the people who should be in your thread at the start. That's it!
How to Pin Messages in your Event Chats
There are two ways to do this.
The first is replying to any message with the word "pin" or "unpin."

The second is using the 📌(:pushpin:) reaction on a message to pin it. Unreacting will unpin the message.
There are a few other thread management options at your disposal - see them all here.